Tools
This section allows to take backup of IXM WEB Database, configure backup settings as per requirement, export data of Transaction Log, and configure Convert and Translate Modules. It consists of following tabs -
-
Convert (This tab will be visible only if Convert license is purchased)
-
Translate (This tab will be visible only if Translate license is purchased)
Screen Layout of IXM WEB Database

Field Description of IXM WEB Database
SQL Server Name:
Displays the SQL Server Name for your reference.
Database Name:
Displays the name of the last backup file for your reference.
Last Backup:
Displays the date of last backup taken for your reference.
Click on Backup button to take latest backup of IXM WEB Database. The backup process will start and upon completion, the backup will be saved in file “Database_DD_MM_YYYY.bak” (default file name) on your local machine.
|
NOTE The application will not allow the user to take a backup if the database connection is configured with SQL Server Authentication.
|

Screen Layout of Options

Field Description of Options
IXM WEB Options can be configured to update or change the Device’s settings. The following sections will be visible on the page for users to apply changes:
-
Employee templates
-
Biometric capture devices
-
Delete the application log
-
Template conversation (NOTE: visible for all the Device types, but functional only for the TOUCH 2 Face Device)
Click on Download Drivers button to download the fingerprint capture Device drivers.
Click on Re-Process button to convert all the TITAN Face template to TOUCH 2 template again.
This section will display all the settings that have already been configured through Manage Preferences button. In case settings have not been configured yet, it will display default settings.
Click on Reset button on the top right corner of the screen to reset all the settings to default. The application will display a confirmation message. Click OK button to continue with resetting or Cancel button to discard the action.
Click on Manage Preferences button on the top right corner of the screen to change configure backup related settings. Following screen will be displayed -

EMPLOYEE
Save Employee Biometrics in Database
Click on the checkbox to enable or disable the feature. A check mark in the box indicates that the feature is active. By default, the feature will be displayed as enabled.
Enabling his feature allows to store the Employee’s biometric templates in the IXM WEB database. By disabling this option, biometric templates will not be saved in the database, but the Employee can save the biometric templates on a Smart Card.
Save Image

This option will be enabled only if Save Employee Biometrics in Database option is selected.
Click on the checkbox to enable or disable the feature. A check mark in the box indicates that the feature is active. By default, the feature will be displayed as enabled.
Enabling this feature allows to store the Employee's fingerprint images in the IXM WEB database. However, that can be a potential threat to security besides consuming database storage space. Therefore, IXM WEB displays a warning message informing the same.

Click on OK button to continue with saving the fingerprint images on the database or click on Cancel button to discard the action.
Certificate for IXM WEB:
“ixm.web” is the default certificate that will be used when SSL settings are enabled. IXM Devices and IXM WEB will use this ixm.web certificate for encrypted communication.
Certificate for IXM WEB Cloud:
When IXM WEB Cloud settings are enabled, IXM Devices will require a certificate to do encrypted communication over the Cloud. “ixm.device” is the default certificate stored in the machine console that is available in the server PC/laptop where IXM WEB is installed.
BIOMETRIC CAPTURE DEVICE
USB Sensor Service Port:
By default, the USB Sensor Service Port is set to 1400, or you can change the port to detect a USB Sensor Device. The application will detect a USB Sensor after successfully updating the USB Sensor driver in your system.
FACE CONVERSION
|
|
This option will be visible only if IXM Face Convert license is purchased. You can request License from License >> Convert option. |
Primary Device:
Select the primary Device for face conversion from the dropdown list. It can be either a TITAN or a TFACE Device.
If the selected Device is offline, the next registered Device that is on line will be selected automatically provided that Device is connected through Ethernet.
If the selected Device goes offline for more than 24 hours while the face conversion process is in progress, the rest of the face images will not be converted and the application log will display "Device is offline" message for such transactions.
DELETE APPLICATION LOGS
Auto-Delete
By default, the Auto-Delete option will be disabled. Enabling Auto-Delete will delete the logs older than a specified number of days. By default, after enabling the Auto-Delete option, IXM WEB will automatically delete application logs every 30 days.
Delete Logs older than (Days):
Enter a value between 1 and 365 days to delete logs older than the entered value.
TEMPLATE CONVERSION
On the Fly Conversion
By default, this option will be enabled. If enabled, IXM WEB will convert the TITAN Face template to a TOUCH 2 template immediately after successful enrollment. If the option is disabled, the conversion will be taken care of by the back-end service instead.
Primary Device for Conversion:
Employees can select the TOUCH 2 Device as the primary Device for Face template conversions.
VISITOR DETAILS
Auto-Delete
By default, the Auto-Delete option will be disabled. Enabling Auto-Delete will delete Visitor's data older than a specified number of days. By default, after enabling the Auto-Delete option, IXM WEB will automatically delete Visitor's data every 30 days.
Delete Visitor Data After:
Enter a value between 1 and 365 days to delete visitor's data older than the entered value.
ID Prefix Type:
Specify the prefix that should be used for Visitor's ID.
Select "Initials" from the dropdown list if you want the Visitor's ID to start with some alphabet(s). Select "Start Value" from the dropdown list if you want the Visitor's ID to start with a particular numeric value.
ID Prefix Value:
Enter the value with which the Visitor's ID should be prefixed depending upon the selected "ID Prefix Type".
TEMPERATURE UNIT
|
NOTE This option will be visible only if IXM Health license is purchased.
|
Temperature Unit
Celsius
Click on this option to select the unit of temperature as Celsius. As a result, temperature will be displayed in Celsius in IXM Health Module and IXM Health reports.
Fahrenheit
Click on this option to select the unit of temperature as Fahrenheit. As a result, temperature will be displayed in Fahrenheit in IXM Health Module and IXM Health reports.
AUTO REFRESH DASHBOARD
Status
Click on the checkbox to enable or disable the feature. A check mark in the box indicates the feature is enabled. By default, the feature is enabled.
Enabling this feature will automatically refresh the Dashboard.
Interval (sec):
Enter the time duration in seconds. The Dashboard will be refreshed after every number of seconds entered here.
DATE FORMAT
Format:
Select the Date Format from the dropdown list. The dates will be displayed and accepted in the selected format across IXM WEB.
The following two date formats are available:
mm/dd/yyyy
This is the default date format.
dd/mm/yyyy
Click on Save button to save the settings. Click on Cancel button to discard the action.
Once the settings are saved, the control will go back to the Options tab and the page will be refreshed with new settings.

|
Screen Layout of Convert

Field Description of Convert
|
NOTE This Module is visible only if License is purchased. You can request License from License >> click on Convert icon.
|
IXM Convert is a revolutionary module in IXM WEB which allows for migration of existing biometric systems to Invixium. This module allows to convert the following types of non-proprietary images / templates into standardized Invixium biometric templates:
Click on this tab to convert the non-proprietary fingerprint images / templates into standardized Invixium biometric templates. Read more...
Click on this tab to convert the non-proprietary face images into standardized Invixium biometric templates. Read more...
Screen Layout of Data Export

IXM Data Export module can be used to configure and export the data from Logs >> Transaction Logs into a "CSV" or "TXT" file. The file containing the exported data can then be used to import that data into any third party system.
Field Description of Data Export
Before exporting, the data needs to be configured by clicking on the Configuration button at the bottom right side of the screen. Read more...
File Name:
Enter the name of the export file.
|
|
The File Name should not contain special characters such as \, /, :, *, ?, ", <, >, | |
Data Separator:
If the export file type is "TXT", enter the data separator.
If the export file type is "CSV", "," will be displayed as the default data separator. It can not be changed.
From Date:
Enter or use the calender icon to specify the date starting which the data should be taken from the Transaction Logs.
|
|
The date range can not be more than 60 days. |
To Date:
Enter or use the calender icon to specify the date up to which the data should be taken from the Transaction Logs.
|
|
The date range can not be more than 60 days. |
Access Events:
Select the Event Type from the dropdown list.
Select "Access Granted" to export only those transactions where the Event is "Access Granted".
Select "Access Denied" to export only those transactions where the Event is "Access Denied".
Select "Both" to export transactions where the Event is "Access Granted" and "Access Denied".
File Format:
Select the File Format for export from the dropdown list. The following are the File Formats:
-
TXT
-
CSV
Include Header
Click on the checkbox to include the Column Names in the export file. If the box is empty, the Column Names will not be displayed.
Click on Configuration button to configure the data for export. The following options will be displayed:

SOURCE
The data will be exported from the Transaction Logs. Hence, the Source is displayed as "Transaction Logs" by default and can not be changed.
SELECT COLUMN(S)
A list of column names belonging to the Transaction Log is displayed as follows:

Click on the respective checkbox of the Column that needs to be exported. Only the selected Columns will be exported. The first four Columns are selected by default which can be changed. But at least one Column should be selected.
You can also change the position of a Column by moving it up or down by clicking on ˄ or ˅ icons respectively. The sequence of the Columns displayed in the export file depends on their position in this list.
ID:
Denotes the serial number of the Column.
Column Name:
Displays the name of the Column in Transaction Logs.
Data Type:
Displays he data type of the Column in Transaction Logs.
Format:
This option allows to change the format of the Column data at the time of export. To do so, enter the appropriate SQL command in this option. For example, the column "TransactionDate" contains both date and time in Transaction Logs. You can extract only the date part by writing the command "FORMAT(TransactionDate, 'yyyyMMdd').
Leave the box blank if you want to export the Column data as it is.
Once done, click on Save Format button to save the format. The application will display an error message in case of wrong command entered. Or else the control will go back to the previous screen.
Click on Apply Filter button to filter the data as per requirement. Following options will be displayed -
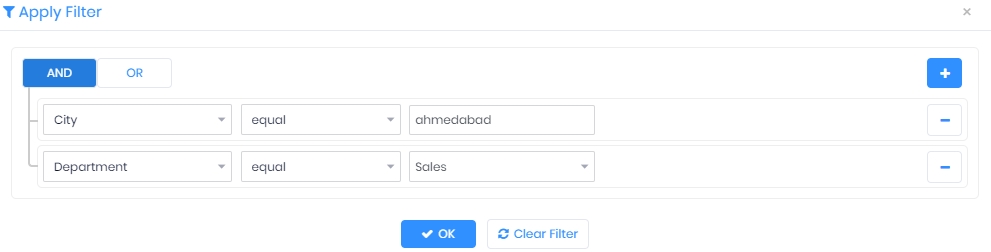
Click on + icon on the right side of the screen to create a multilevel condition. You can remove a particular condition by clicking on - icon on its row. You can use AND and OR operators by clicking on their respective buttons on the top. The first column in the list displays the field name. The second column displays the condition and the third column accepts the value of the selected field.
Click on OK button to save the Filter condition or Clear Filter button to remove the entered filter condition.
Click on Export button to export the data from Transaction Logs to the export file as per the configuration and filter applied. The file will be downloaded automatically in the "Downloads" folder. The file name is a combination of name entered in "File Name" + mm-dd-yyyy + h-m-s. Sample TXT file