|
|
Communication
This tab allows you to configure Communication related settings of the Device.
Screen Layout of Communication
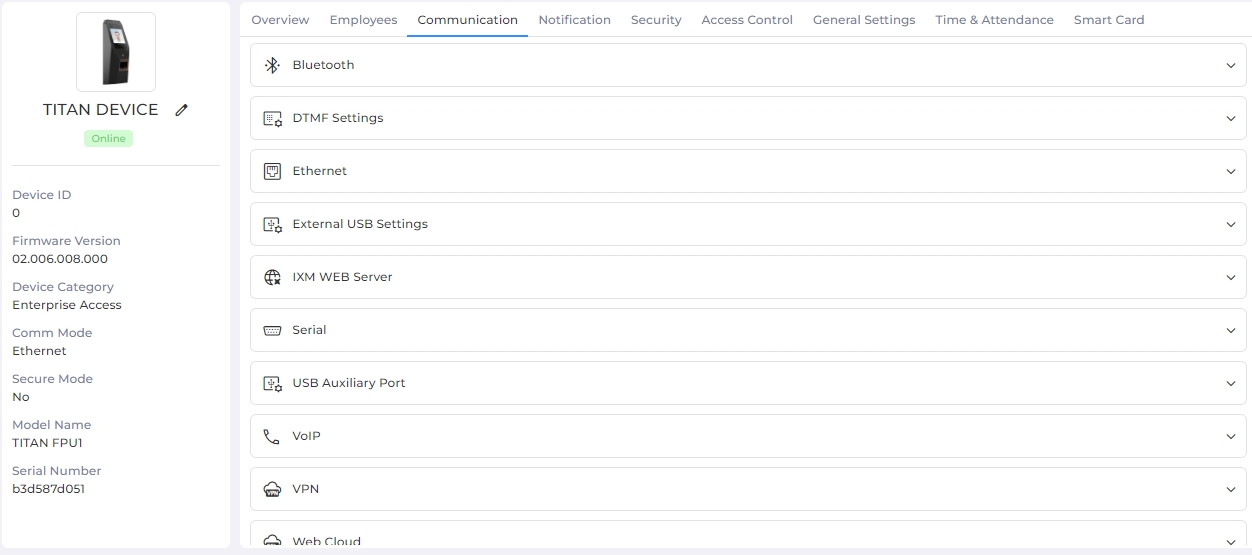
Field Description of Communication
It contains various sections to save respective settings. Click on the particular section to expand it.

|
This section will be displayed only if Bluetooth is supported by the selected Device. |
It allows users to enable or disable Bluetooth on the Device. Once Bluetooth is enabled, users can then see and scan all nearby Bluetooth destinations.
Click on the switch to turn Bluetooth ON or OFF. Following buttons will be displayed when Bluetooth is enabled.
RESET
Click on this button to restore the original setting of Bluetooth.
SCAN
Click on this button to scan nearby Bluetooth devices. A list of such devices will be displayed as follows -

Click on the Pair button of the respective device to connect it. Once paired successfully, the Bluetooth device can transfer image / audio files to IXM Device. You can also unpair Bluetooth devices by clicking on Un-pair button from scan list.
|
NOTE Invixium Devices support RFC2833 Out Of Band RTP DTMF.
|
This section allows users to enable or disable DTMF feature on the Device. It also allows to set DTMF code to open the door.
Click on the switch to turn DTMF ON or OFF. Following buttons will be displayed when DTMF is enabled.

Send Wiegand
Click on the checkbox to enable or disable the feature. A check mark in the box indicates the feature is enabled. Enabling this feature will send Wiegand to Open the door.
Door Open
Indicates the DTMF event. Here it is opening of the door.
Code
Enter the DTMF code to open the door. It should be between 0 and 99.
Once entered, click on APPLY button to save and apply the settings.
Click on RESET button to restore the original settings.
This section allows users to change the Device IP mode from DHCP to Static and vice-verse. DHCP Mode automatically detects the IP address, subnet mask and gateway of the Device. Whereas, Static Mode allows the user to enter IP address and other details.
Following options will be displayed -

Mode:
Click on the box to change IP Mode from DHCP to Static or vice-verse.
IP Address:
In case of Static Mode, you can change the IP address of the Device.
In case of DHCP Mode, this field will remain disabled.
DNS 1:
In case of Static Mode, you can change the primary DNS address of the Device.
In case of DHCP Mode, this field will remain disabled.
DNS 2:
In case of Static Mode, you can change the secondary DNS address of the Device.
In case of DHCP Mode, this field will remain disabled.
Port:
In case of Static Mode, you can change the Port Number of the Device. You can also use the <up arrow> and <down arrow> keys to change it.
In case of DHCP Mode, this field will remain disabled.
Subnet Mask:
In case of Static Mode, you can change the Subnet Mask of the Device.
In case of DHCP Mode, this field will remain disabled.
MAC ID:
Displays the MAC ID of the Device. You can not change it.
Gateway:
In case of Static Mode, you can change the Gateway address of the Device.
In case of DHCP Mode, this field will remain disabled.
Speed:

|
This option is applicable for TITAN and TFACE Devices only. |
Select the speed of communication from the dropdown list. For TFACE Devices, the default speed will be 100 MBPS. The following are the options:
-
Auto
The link will be connected based on the speed configured at the managed switch.
-
10 MBPS
The link will be connected at the speed of 10 MBPS or less.
-
100 MBPS
The link will be connected at the speed of 100 MBPS or less.
Click on APPLY button to apply the settings. In case of DHCP Mode, the application will automatically detect and display the IP Address and other settings of the Device.
Click on RESET button to restore the original settings.
|
NOTE You can also assign a Static IP Address from the Device LCD. Read more... |
This section allows users to enable or disable USB Port(s) on the Device. By default all the USB Port(s) on the Device will be enabled.
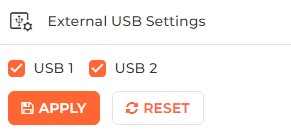
The application will detect and display External USB Ports available on the selected Device.
Click on the box of respective USB to enable or disable it. A check mark indicates that the USB Port is enabled.
Once done, click on APPLY button to save and apply the settings.
Click on RESET button to restore the original settings
This section allows to enter URL of IXM WEB Server as follows -
URL:
Enter the URL of IXM WEB server.
Once entered, click on APPLY button to save and apply the settings.
Click on RESET button to restore the original settings.
This section allows to configure settings related to Serial mode of communication of the Device -

Baud rate:
Click on the box to select the Baud rate from the given list.
Serial Mode:
Click on the box to select the mode of serial communication. Select either RS-232 or RS-485 from the list.
Parity Bit:
Click on the box to select the type of Parity Bit. Select None, Odd, or Even from the list.
Stop Bit:
Click on the box to select the Stop Bit for the Parity Bit. Select 1 Bit or 2 Bits from the list.
Once entered, click on APPLY button to save and apply the settings.
Click on RESET button to restore the original settings.
This section allows users to activate or deactivate USB Auxiliary Port on the Device. By default USB Auxiliary Port Status is displayed as “On”.
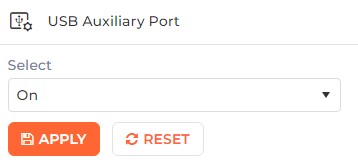
|
Select:Click on the box to select On if you want to activate the port on the Device. Select Off if you want to deactivate the port and HID if the port is HID compliant. |
Once entered, click on APPLY button to save and apply the settings.
Click on RESET button to restore the original settings.
This section allows users to enable or disable Virtual Network Computing. Through VNC user can remotely access Device LCD by using Device IP Address and port.

Status
Click on the checkbox to enable or disable the feature. A check mark in the box indicates the feature is enabled. Enabling this feature will activate VNC for the selected Device.
Password:
Enter the password to access the Device remotely.
Once entered, click on APPLY button to save and apply the settings.
Click on RESET button to restore the original settings.
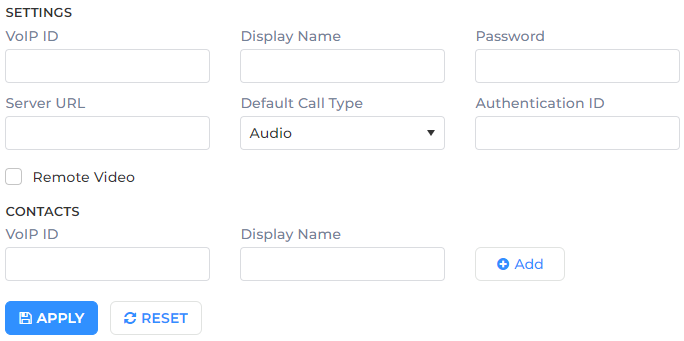
This section allows users to configure VoIP settings for the selected Device. VoIP is a technology that allows telephone calls to be made over computer networks like the Internet. VoIP converts analog voice signals into digital data packets and supports real-time, two-way transmission of conversations using Internet Protocol (IP).
|
NOTE VoIP server needs to be installed and configured in the same network as Invixium Devices. IXM Devices work as VoIP clients. Once the VoIP server is configured, you can configure VoIP settings.
Although IXM devices support all general VoIP servers, they have been tested with 3CX VoIP server running on versions 18.0 Update 3 (Build 461) V1.4, and 18.0 Update 7 (Build 312) V1.3. |
VoIP
Click on the switch to turn VoIP feature ON or OFF. Following options will be enabled when VoIP is turned ON.
SETTINGS
VoIP ID:
Enter the Device VoIP ID for SIP Server extension.
Display Name:
Enter the name that you want to display during a VoIP call.
Password:
Enter the password used in the SIP server.
Server URL:
Enter the URL or IP Address for the SIP Server.
Default Call Type:

This option is available only on the TITAN device.
Select either Audio or Video from the given list.
Authentication ID:
Enter the Authentication ID for SIP Server extension.
Remote Video
Click on the checkbox to enable remote streaming of video during a VoIP call. A check mark in the box indicates the feature is enabled.
CONTACTS
This section allows to add contacts on the selected Device. You can add multiple contacts. Click on Add button to add a new contact. Click on ![]() icon to remove a contact.
icon to remove a contact.
VoIP ID:
Enter the VoIP ID for the contact.
Display Name:
Enter the contact name.
Default:
The first contact is automatically set as default. You can change it by clicking on the radio button to make the contact default.The selected default contact will be contacted over VoIP when the bell icon is pressed on the Device screen (if applicable).
Once entered, click on APPLY button to save and apply the settings.
Click on RESET button to restore the original settings.
IXM WEB allows users to configure VPN profile settings on IXM Device. You can create only one VPN Profile on single IXM Device to establish VPN Connection.
Click on the switch to turn VPN feature ON or OFF. Turn the feature ON to create VPN Profile and establish communication over VPN
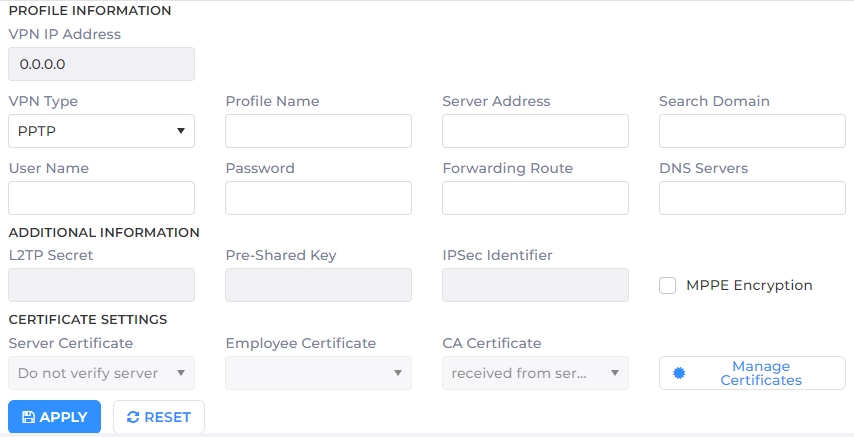
Following options will be enabled when VPN is turned ON -
PROFILE INFORMATION
VPN IP Address:
Default VPN IP Address will be displayed as “0.0.0.0”.
VPN IP Address will be displayed once VPN successfully connects on IXM Device.
NOTE VPN IP Address will not be displayed until VPN settings are activated on IXM Device.
VPN Type:
Click on the field to select VPN Type to establish particular protocol on IXM Device. Following protocols will be displayed -
PPTP
L2TP/IPSec – PSK
L2TP/IPSec – RSA
IPSec Xauth PSK
IPSec Xauth RSA
IPSec Hybrid RSA
Profile Name:
Enter the Name to identify VPN Profile setting on IXM Device.
Server Address:
Enter the Server Address with which VPN setting will establish communication on IXM Device. Server Address should be inserted in IP Address format only.
Search Domain:
Enter the name of Search Domain.
User Name:
Enter the user name to identify user who has created VPN profile on IXM Device.
Password:
Enter the password to authenticate VPN profile setting.
Forwarding Route:
Enter the routing address in IP Address format.
DNS Servers:
Enter DNS Server address for VPN Profile Setting.
ADDITIONAL INFORMATION
L2TP Secret:

This option will be enabled when VPN Type is selected as "L2TP/IPSec – PSK" or "L2TP/IPSec – RSA".
Enter the Secret Key to establish VPN communication.
Pre-Shared Key:

This option will be enabled when VPN Type is selected as "L2TP/IPSec – PSK" or "IPSec Xauth PSK".
Enter the Pre-shared Key to establish VPN Settings.
IPSec Identifier:

This option will be enabled when VPN Type is selected as "L2TP/IPSec – PSK" or "IPSec Xauth PSK".
Enter the Password to identify IPSec protocol for VPN settings.
MPPE Encryption

This option will be enabled when VPN Type is selected as "PPTP".
Click on the box to activate or deactivate MPPE Encryption for VPN Profile setting. A check mark in the box indicates the feature is active.
CERTIFICATE SETTINGS
Server Certificate:
Click on the box to select already installed Server Certificate.
NOTE Please note the following -
Service Certificate should already be installed. Only then it will be available to select.
This option will be enabled when VPN Type is selected as "L2TP/IPSec – RSA" or "IPSec Xauth – RSA" or "IPSec Hybrid RSA".
Employee Certificate:
Click on the box to select already installed Employee Certificate.
NOTE Please note the following -
Employee Certificate should already be installed. Only then it will be available to select.
This option will be enabled when VPN Type is selected as "L2TP/IPSec – RSA" or "IPSec Xauth – RSA".
CA Certificate:
Click on the box to select already installed CA Certificate.
NOTE Please note the following -
CA Certificate should already be installed. Only then it will be available to select.
This option will be enabled when VPN Type is selected as "L2TP/IPSec – RSA" or "IPSec Xauth – RSA" or "IPSec Hybrid RSA".
Click on
button to upload a Certificate. Following screen will be displayed -
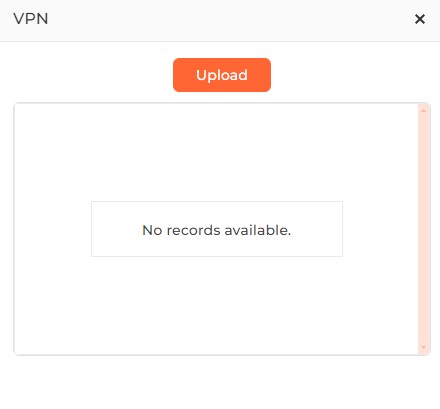
Click on Upload button to select the required Certificate from its respective path.

The application will check for the valid format. You can select files with extension ".pfx", ".p12" and ".crt".
Once the file is uploaded, you can install the Certificate. Installed Certificates will be now available to select in their respective dropdown lists.
Once all the settings are entered, click on APPLY button to save the settings. Connection will be attempted with new settings. On successful connection, the application will display the connection status as "Connected" near the VPN switch. In case connection can not be established due to some reasons, appropriate messages will be displayed and the connection status will remain "Disconnected".
|
NOTE Once VPN Connection status is “Connected”, you can select "VPN" as Communication Mode in Device settings and check the VPN IP Address upon which VPN Communication will take place. |
Click on RESET button to restore the original settings.
|
|
This feature allows users to enable communication between IXM WEB hosted on cloud and IXM Devices installed at a remote location.
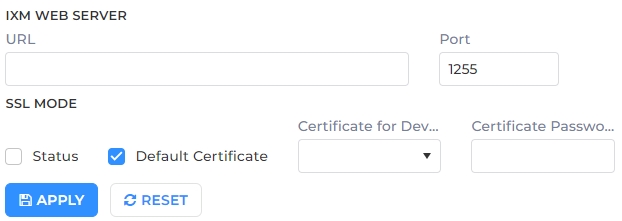
Click on the switch to turn Web Cloud feature ON or OFF. Following options will be enabled when Web Cloud is turned ON -
IXM WEB SERVER
URL:
Enter the Cloud URL / IP Address where IXM Web is hosted or installed.
Port:
Enter the listing port of WEB cloud. The default port is 1255.
SSL MODE
Status
Click on the box to enable or disable SSL mode. A check mark in the box indicates the mode is enabled.
Default Certificate
Click on the box to enable or disable Default Certificate for SSL mode. A check mark in the box indicates the Default Certificate is enabled.
Certificate for Device:
Click on the box to select the Device Certificate for SSL communication. A Device Certificate needs to be selected if Default Certificate option is inactive.
Certificate Password:
Enter the Certificate Password if required.
Once entered, click on APPLY button to save and apply the settings.
|
NOTE Once the settings are saved, you can Auto Discover and register all the IXM Devices on which IXM Cloud setting is turned ON with a valid cloud URL. |
Click on RESET button to restore the original settings
|
NOTEYou can also configure the Cloud settings from the Device LCD. Read more... |
This section allows users to enable or disable Wi-Fi on IXM Devices. Once Wi-Fi communication is enabled on IXM Device, user can then scan all nearby Wi-Fi destinations and connect to a particular Wi-Fi by providing network parameters.
Click on the switch to turn Wi-Fi feature ON or OFF. Once Wi-Fi is turned ON, a list of available connections will be displayed as follows -
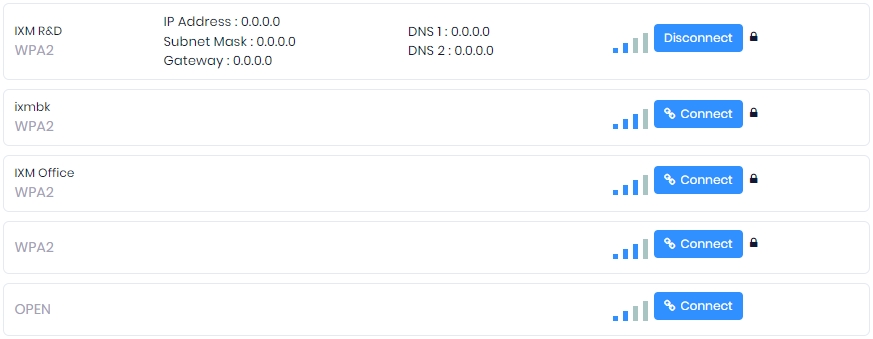
If a Wi-Fi connection already exists, the application will display information related to that connection on the top. You can disconnect by clicking on Disconnect button on its respective row.
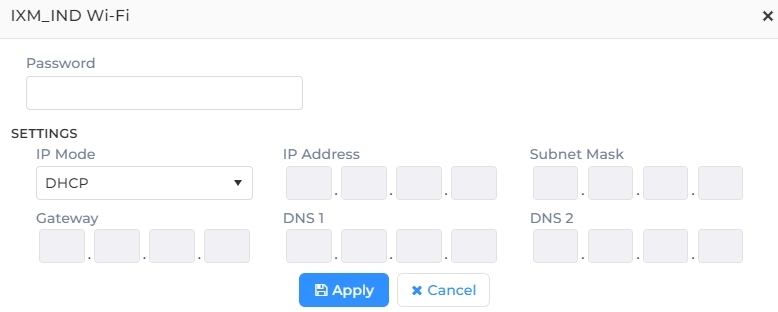
Click on Connect button to establish connection with a Wi-Fi destination. Following screen will be displayed to enter network parameters -
Password:
Enter the Password for secure connection over Wi-Fi. For non-secure mode there is no need to set any particular password.
SETTINGS
IP Mode:
Click on the box to select IP Mode as "DHCP" or "Static" from the dropdown list.
IP Address:
In case of "DHCP" mode, enter the IP Address of the Device.
In case of "Static", this option will remain disabled.
Subnet Mask:
In case of "DHCP" mode, enter the Subnet Mask Address of the Device.
In case of "Static", this option will remain disabled.
Gateway:
In case of "DHCP" mode, enter the Gateway Address of the Device.
In case of "Static", this option will remain disabled.
DNS1:
In case of "DHCP" mode, enter the DNS1 Address of the Device.
In case of "Static", this option will remain disabled.
DNS2:
In case of "DHCP" mode, enter the DNS2 Address of the Device.
In case of "Static", this option will remain disabled.
Once entered, click on Apply button to connect to the destination. Click on Cancel button to discard the action.
|
NOTE Once the Wi-Fi communication parameters are applied, you can switch on to Wi-Fi network by selecting "Wi-Fi" as Communication Mode in Device settings. |
