|
|
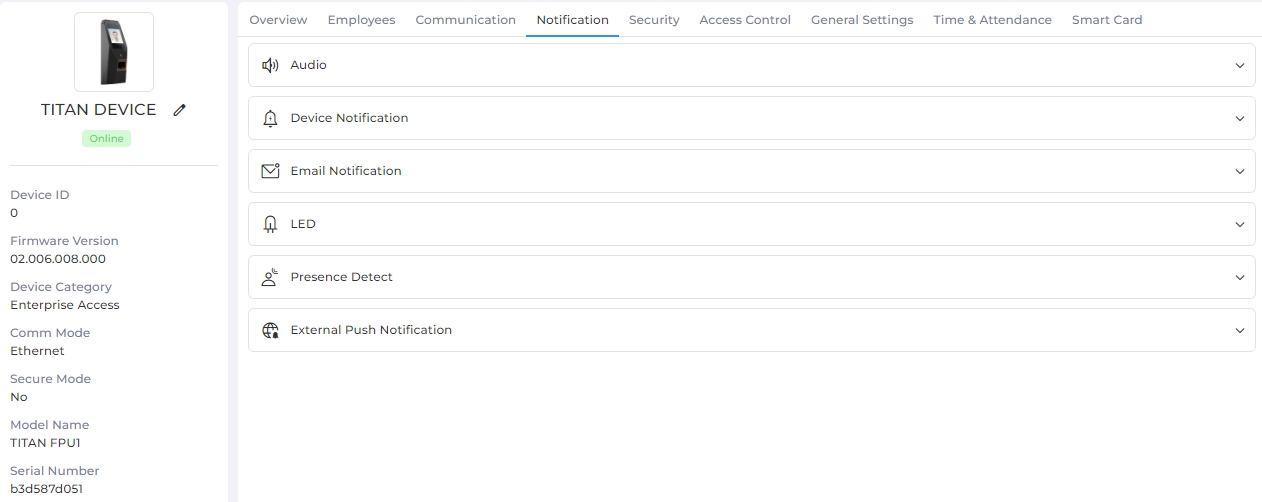
Notification
This tab allows you to configure Notification related settings of the Device.
Screen Layout of Notification
Field Description of Notification
It contains various sections to save respective settings. Click on the particular section to expand it.
All Invixium Devices support the Audio feature in the form of a built-in speaker (All except MYCRO) or a multi-tone buzzer (IXM MYCRO). Audio feature is used for alerts and notification purposes. For example, if a Device is in an alarm state, then the audio file will be played. Hence the administrator will be notified about the events on the Device. Audio also guides the administrator and users during the authentication process.
See the list of predefined Events and their default Sound...
A list of predefined Events along with their respective Audio file will be displayed as follows -
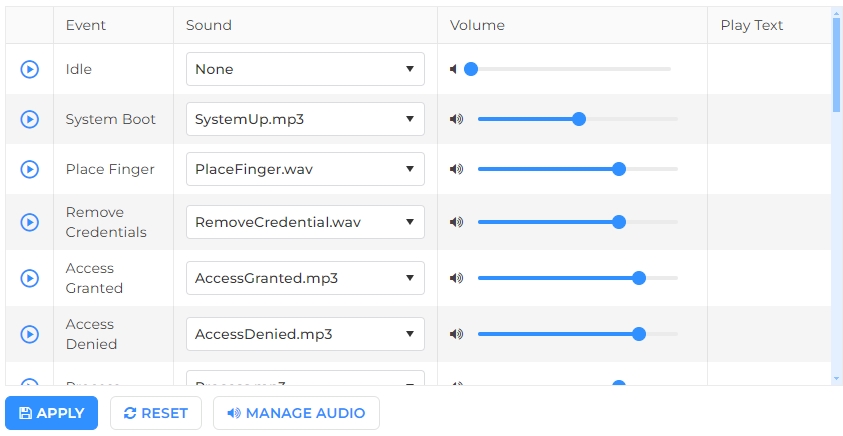
Event:
Displays the event on which an audio file should be played.
Sound:
Click on the box to select appropriate audio file from the dropdown list. This sound will be played whenever its event is triggered. Once the event is cleared, its audio will also stop.
A default file will be shown as selected. You can change to any other file in the list. You can also upload an audio file by using Manage Audio button at the bottom of the tab.
Note: Following are the supported extension types of Audio files in the Device:
-
.mp3
-
.mp4
-
.aac
-
.wav
-
.flac
-
.ogg
-
.imy
-
.m4a
Volume:
Adjust or set the loudness of sound for the event by using the volume bar.
Play Text:
Enter the text that should be played whenever the event is triggered.
|
NOTE The text will be played only if Text to Speech feature is enabled. It will be played on the Device only.
|
Once entered, click on APPLY button to save and apply the settings.
Click on RESET button to restore the original settings.
Click on MANAGE AUDIO button to upload new Audio files to the system. Following screen will be displayed -
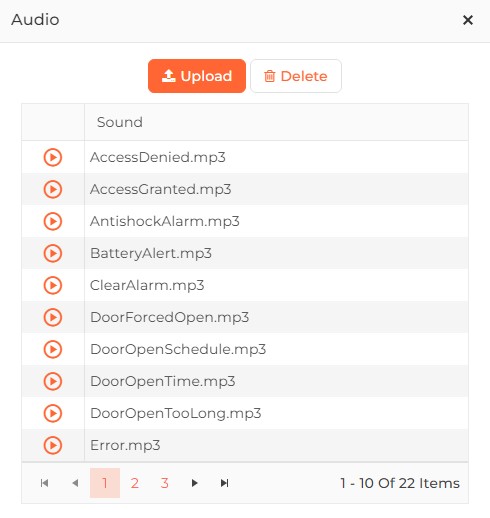
Click on Upload button to upload new Audio files onto IXM WEB from the system. Upon successful upload of audio, the application will show the following message -
In case wrong file is chosen, IXM WEB will display alert message as follows -

To delete a particular Audio file from IXM WEB, select that file by clicking on it and then click on Delete button. This will remove that Audio file from the dropdown list.
IXM WEB allows users to configure Device Notification settings. The purpose of Device Notifications is to personalize the Device LCD notification for multiple events. IXM WEB allows users to set images, background audio, and display text.
|
NOTE In the state of an alarm, the Device Notification will be ignored. Once the alarm clears and the Device is back in an idle condition, then the Device Notification feature will be active again.
|
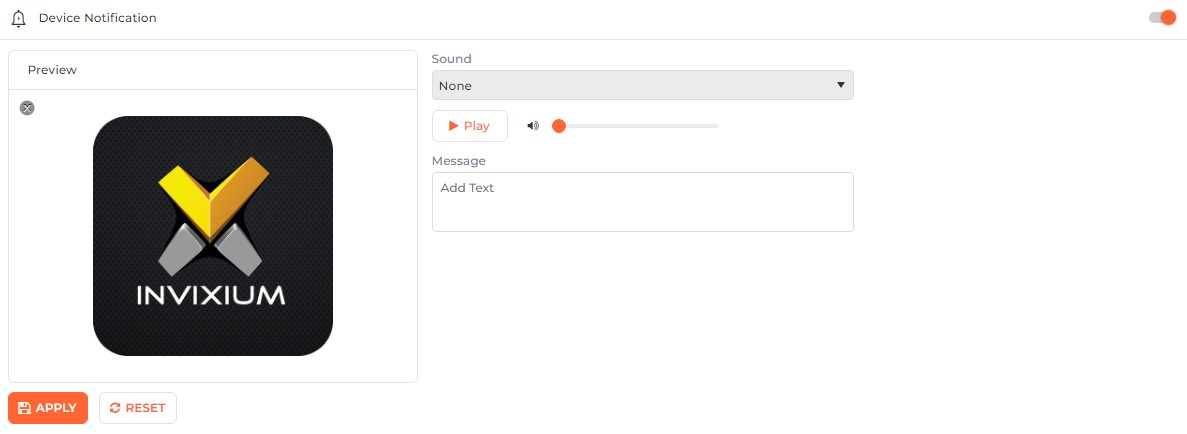
Click on the switch to turn Device Notification feature ON or OFF. Following options will be enabled when the feature is turned ON -

Preview:
Click the Add Image icon to set an image for the Device. The application will give options to select / upload an image -
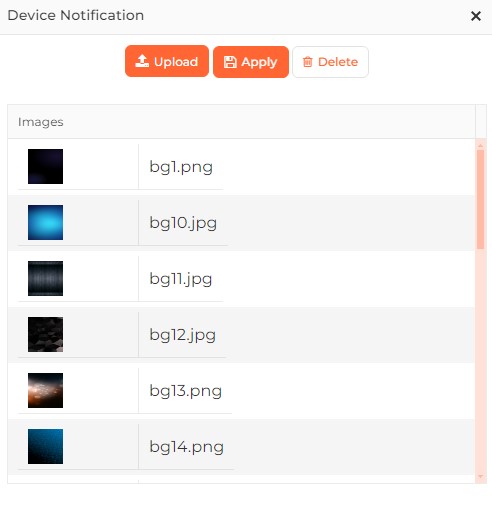
Click on Upload button to upload a new image to the Device from its path. Once the image is uploaded, the application will show a success message and the image file will be displayed in the list.
Select the uploaded image or any other desired image from the list and click on Apply button. The selected image will be assigned to the Device as follows -
To delete a particular image file, select that file by clicking on it and click on Delete button. It will delete the image file from the Device and the list.
Sound:
Click on the box to select the audio file that should be played when the Device is in idle mode from the dropdown list.
Click on  button to hear the sound of selected audio file. You can also adjust the volume of sound by using the adjacent volume bar.
Message:
Enter the message that should be displayed when the Device is in idle mode.
Once entered, click on APPLY button to save and apply the settings.
Click on RESET button to restore the original settings.

|
E-mail Notification is a very important feature in all Invixium Devices. When something unusual happens on any of the Devices in the network, an email will be sent to the user who is configured on that Device. Upon reception of the email, the user can take necessary actions depending on the notification. So, when a specific event occurs, the Device will check whether email notification is enabled for that event. If email notification is enabled, then the Device will send an email to the configured email addresses. Following option will be displayed -
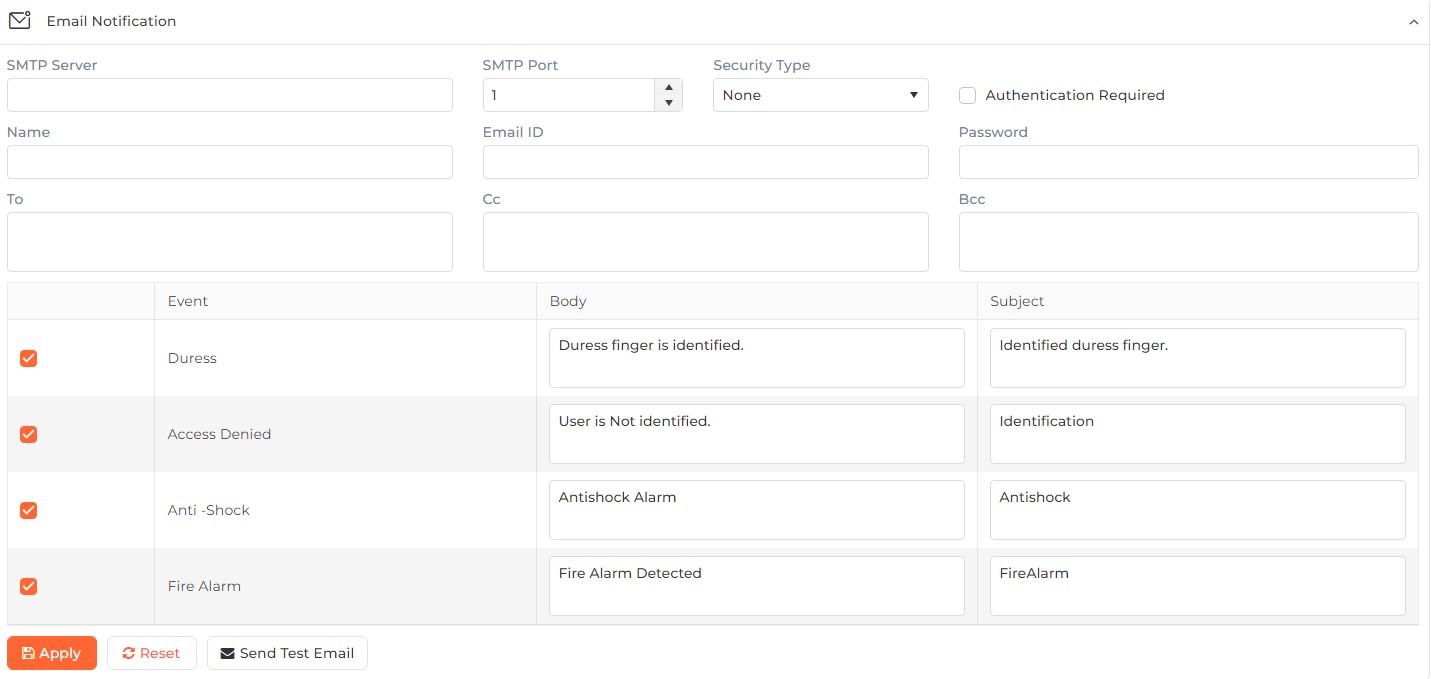
SMTP Server:
Enter the value of the email server domain used to receive or send emails. For example, smtp.office365.com, pop.gmail.com, smtp.yahoo.com, etc.
SMTP Port:
Enter the value of the port number based on the selection of security type value and SMTP server configuration.
Security Type:
Choose any one of the security types out of None, Start TLS, SSL options.
Authentication Required
Click on the box to enable or disable Authentication Required feature. A check mark in the box indicates the feature is enabled.
Enable this option if Security Type is selected as "Start TLS" or "SSL".
Name:
Enter the name that you want to display in the email notification template.
Email ID:
Enter the email address from which you want to send an email notification.
Password:
Enter the password to log in to the SMTP Server.
TO:
Enter the email addresses to whom the email has to be sent.
CC:
Enter the email address of the recipients to whom you want to mark copy on email notification.
BCC:
Enter the email address of the recipients whom you want to mark BCC on email notification.
Next, a list of events that will be notified through email will be displayed as follows -
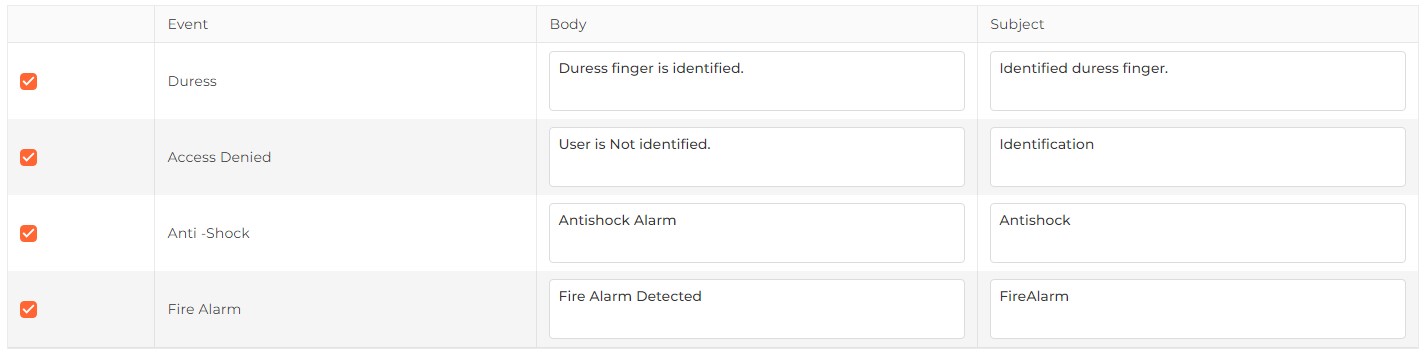
Checkbox:Click on the box to enable or disable Email notification for the particular event. A check mark in the box indicates that the feature is enabled.Event:
Displays the Event that should be notified through an Email. Following are the events -
Battery Discharge (Only for battery supported devices)
This event is triggered if the battery is getting discharged.
Critical Battery (Only for battery supported devices)
This event is triggered if the battery is in a critical state and requires charging.
Duress
This event is triggered when any user is authenticated successfully using a duress finger.
Access Denied
This event is triggered when an unsuccessful authentication is attempted on a Device.
Anti-Shock
This event is triggered when an Anti-Shock (Vandal Theft Protection) alarm is generated.
Fire Alarm
This event is triggered when the Fire alarm is generated.
Body:
Enter the Body text of the Email to be sent. A default Body text is already displayed. You can change it.
Subject:
Enter the Subject of the Email to be sent. A default Subject text is already displayed. You can change it.
Once entered, click on APPLY button to save and apply the settings.
Click on RESET button to restore the original settings.
Click on SEND TEST EMAIL button to test and verify if the provided values for email notification settings are working properly. If all the provided values are proper then a test email will be received.
|
|
IXM WEB allows users to change values of LED colors, counters, LED durations and LED intervals in case of certain events. Following options will be displayed -

Event:
Select the event from the dropdown list for which you want to configure the LED setting.

|
Color:
Choose a minimum of one or maximum of three color LED colors from the dropdown list. The Device supports Red, Blue, Magenta, Cyan, Green & Yellow colors.
Duration:
Enter the numeric value in milliseconds, the LED will blink for this long on the Device.
Interval:
Enter the numeric value in milliseconds, the LED colour will blink for that interval.
Counter:
Enter the value for the number of times the LED will blink on the Device.
Once entered, click on APPLY button to save and apply the settings.
Click on RESET button to restore the original settings.
|
|
IXM WEB allows users to enable or disable the Auto On feature for Secugen Sensors and Lumidigm Sensors when Presence Detect is activated. If a person comes near the IXM Device, it will automatically detect their presence and inform the system. Admins can define the action that takes place when presence is detected.
|
NOTE The Presence Detect feature is available on SENSE2, TOUCH2, TFACE, and TITAN series.
|
Following options will be displayed -
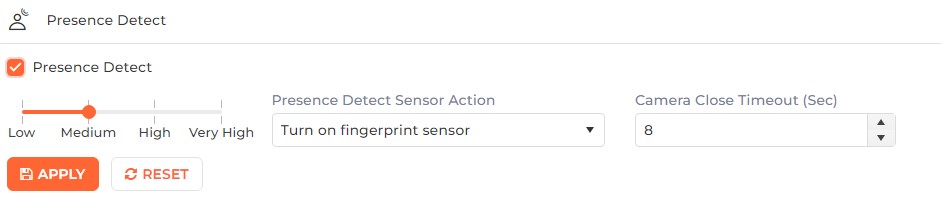
Presence Detect
Click on the box to enable or disable Presence Detect feature. A check mark in the box indicates the feature is enabled.
When presence is detected, the Device turns the sensor on and starts capturing an image. Using this feature, power and sensor life can be saved. The mercury sensor is always ON when the Device is in identification mode. When a mercury sensor is installed in an outdoor environment, it is continuously on and will get hot. To overcome this problem, Invixium has provided this feature. Enable the “Presence Detect” feature to detect the presence and turn the sensor ON only when a user is detected or else it will turn OFF.
The Presence Detect option is “ACTIVE” by default for IXM Devices. Un-check the box to set Presence Detect to “INACTIVE” to keep the sensor active at all times which will display a warning window -

|
NOTE Invixium recommends keeping the Presence Detect feature active.
|
You can also specify the range within which the user gets detected. There are four levels: Low, Medium, High, and Very High. Drag the bar as per your requirement.
Presence Detect Sensor Action:
When presence is detected, the Device turns the LCD / Fingerprint Sensor on. In idle cases, LCD / Fingerprint Sensor will be turned OFF. When a user comes closer to the INDIUM Device, it will turn ON the LCD / Fingerprint Sensor automatically. Using this feature, the life of the LCD / Fingerprint Sensor increases, and power is saved.
Click on the box to select the action when presence is detected from the dropdown list.
Selecting "Activate LCD" will activate the LCD only when presence is detected.
Selecting "Turn On Fingerprint Sensor" will activate Fingerprint Sensor only when presence is detected.
Selecting "Both" will activate LCD, Fingerprint Sensor, and Camera only when presence is detected. The Camera will be activated only in case of TITAN and TFACE Devices.
Camera Close Timeout (sec):
|
|
This option is visible for TITAN and TFACE Devices only. |
Enter the time duration (5 to 120 seconds) up to which the camera should remain open after a presence is detected. The default timeout duration is 8 seconds. This feature maintains an optimal throughput, particularly during continuous multiple detections.
Once entered, click on APPLY button to save and apply the settings.
Click on RESET button to restore the original settings.
The External Push Notification feature allows the Device to integrate with a third party system by sending real time notifications. So, whenever any event occurs on a Device such as authentication, anti-shock alarms, door alarms, etc., the Device will send all events to the specified third party server in the form of HTML data.
Click on the switch to turn External Push Notification feature ON or OFF. Following options will be enabled when this feature is turned ON -
URL:
Enter the third party URL on which all Notifications have to be sent.
Entry Order:
Select the order in which the events in Transaction Logs will be sent from the Device to the specified third party server. By default "Descending" order is selected.
Select "Descending" if the events in Transaction Logs have to be sent in descending order.
Select "Ascending" if the events in Transaction Logs have to be sent in ascending order.
Once entered, click on APPLY button to save and apply the settings.
Click on RESET button to restore the original settings.