|
|
Security
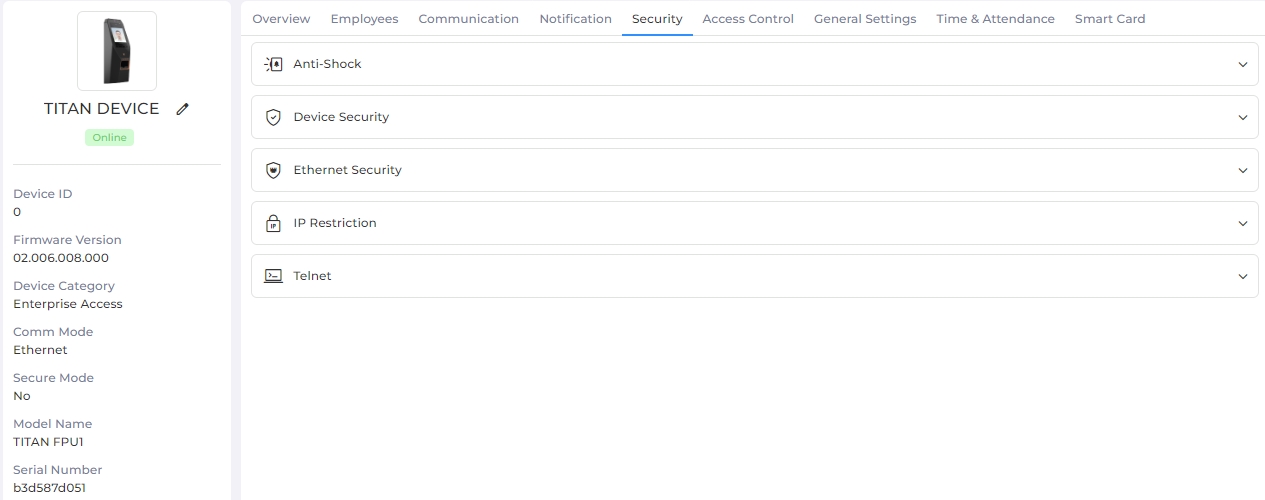
This tab allows you to configure Security related settings of the Device.
Screen Layout of Security

Field Description of Security
It contains various sections to save respective settings. Click on the particular section to expand it.
INVIXIUM products are IP65 rated and may be mounted at the front door of homes and businesses. As these Devices are mounted outside, they have been made tamper proof. Hence if someone tries to steal the Device, it will sound an alarm and start beeping.
Anti-shock is triggered by shock / vibration or when the Device is removed from the mounting. IXM Devices have an accelerometer and/or reed switch to detect anti-shock. The administrator can enable or disable anti-shock detection and can also configure the actions which will take place when anti-shock occurs.
Click on the switch to turn Anti-Shock feature ON or OFF. Following buttons will be enabled when Anti-Shock feature is turned ON -

SENSITIVITY
Adjust the sensitivity of the Device to detect shock. There are four levels: Low, Medium, High, and Very High. Drag the bar as per your requirement.
ACTIONS
Select the actions that should be performed in case a shock is detected by the Device.
Delete All Employees
This action will remove all the enrolled Employees from the Device. It is very important to delete all Employees because their details are stored on the Device.
Click on the box to enable or disable the action. A check mark in the box indicates the action is enabled.
Deactivate Biometric
This action will disable the biometric identification, so no one will be identified on the Device if Anti-shock alarm goes off.
Click on the box to enable or disable the action. A check mark in the box indicates the action is enabled.
Send Wiegand
When anti-shock alarm occurs, the Device will send the Wiegand to the panel to inform the panel that the Device has been tampered with.
Click on the box to enable or disable the action. A check mark in the box indicates the action is enabled.
Audio Alert
When anti-shock occurs, the Device will play the set audio. This will help the admin distinguish between different events.
Click on the box to enable or disable the action. A check mark in the box indicates the action is enabled.
LED Alert
When anti-shock alarm occurs, the Device will flash the LEDs, so that admin can distinguish different events.
Click on the box to enable or disable the action. A check mark in the box indicates the action is enabled.
Once entered, click on APPLY button to save and apply the settings.
Click on RESET button to restore the original settings.
|
NOTE You can also configure Anti-Shock from the Device LCD. Read more...
|
The Device Security feature allows the administrator to set the Device's security settings. Only the administrator has access to the IXM Devices to make changes in the configuration. The admin can configure different types of credentials. Following options will be displayed -

SECURITY SETTINGS
Login Mode:
Click on the box to select Login Mode from the dropdown list. Following Login Modes are allowed -
PIN Only
Biometric + PIN
Biometric Only
Face Only
(Available for the TITAN series, TOUCH 2 with Face devices, and TFACE series)
Face + PIN
(Available for the TITAN series, TOUCH 2 with Face devices, and TFACE series)
PIN:

This option will NOT be displayed when Login Mode is selected as either "Biometric Only" or "Face Only".
Enter a 4 to 10-digit Pin for selected Login Mode.
Time Out:
Enter the Time Out in seconds.
For the entered time, the Device will not ask for authorization to open the Device application.
PROTECT APP MENU

|
This feature is applicable to LCD based Devices only. |
This feature allows to protect the Device menu from unauthorized opening from its LCD.
Activate
Click on the box to enable or disable this feature. When this feature is enabled, the user will have to authenticate as per the selected Login Mode to open the Device Menu from its LCD. For example, if Login Mode is selected as "PIN Only", then the user will have to enter the valid Pin to open the Device menu.
Once entered, click on APPLY button to save and apply the settings.
Click on RESET button to restore the original settings.
This section allows users to upload and use another custom SSL Certificate instead of Default Certificate provide by IXM WEB and IXM Firmware. Following options will be displayed -

UPLOAD SSL CERTIFICATE
Click on Select Certificate button to select a Certificate file from its path. Please note that the extension of the selected file should be ".pfx".
Certificate Password:
Enter the Password to access the selected Certificate file, if required.
Click on Upload to Device button to upload the selected Certificate to the Device.
SSL MODE
Status
Once the Certificate is uploaded successfully, you can enable the SSL mode of communication on the Device.
Click on the box to enable or disable the Status. A check mark in the box indicates the Status is enabled.
Default Certificate
By default, Device comes with “default.pfx” certificate, which can be used to enable Secure Ethernet communication between Device and IXM WEB.
Click on the box to enable or disable the Default Certificate. A check mark in the box indicates that the Default Certificate will be used. A blank box indicates that the custom SSL Certificate will be used.
Certificate for Device:
If custom SSL Certificate has to be used, then click on the box to select the uploaded custom Certificate from the dropdown list.
Certificate Password:
Enter the Password to access the selected Certificate, if required.
Click on Delete button to delete an uploaded Certificate.
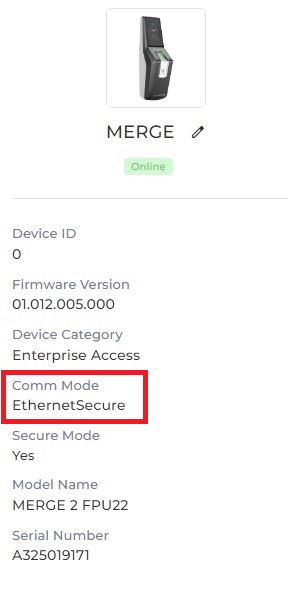
Once entered, click on APPLY button to save and apply the settings. You can verify whether the Device is in secured Ethernet mode or not by checking the “config” tile. You will see the Communication Mode as “Secured Ethernet” mode on the tile as shown below.

Click on RESET button to restore the original settings.
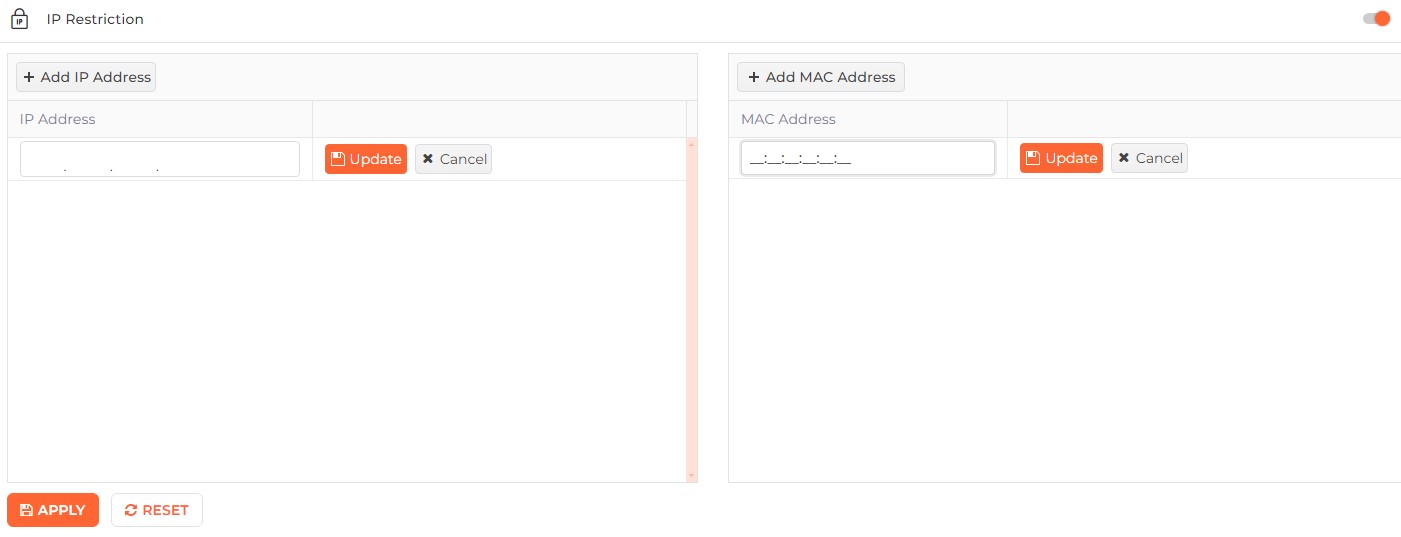
This section allows users to restrict the use of IXM Devices on other IXM WEB installations. The administrator can give IP Restriction based on an IP address or a MAC address.
Click on the switch to turn IP Restriction feature ON or OFF. Following buttons will be enabled when IP Restriction feature is turned ON -

To add an IP Address, click on Add IP Address button and provide the machine’s IP address through which the Device can be accessed. Once entered, click on Update button to save the IP Address or Cancel button to discard.
To add MAC Address, click on Add MAC Address button and provide the machine’s MAC address through which the Device can be accessed. Once entered, click on Update button to save the MAC Address or Cancel button to discard.
Once entered, click on APPLY button to save and apply the settings.
Click on RESET button to restore the original settings.
This section allows users to establish connection to Device through Telnet. Following option will be displayed -
Status
Click on the box to enable or disable Telnet Status of IXM Device. A check mark in the box indicates that the feature is enabled.
Once entered, click on APPLY button to save and apply the settings.
Click on RESET button to restore the original settings.